URU Card - minimal FIDO2 implementation with Arduino
This update was delayed due to summer holidays but it brings achievement of the very important milestone. Now we have a very minimal implementation of the FIDO2 authentication protocol on the Arduino framework. The simplicity of the Arduino platform and the availability of the hardware opens the door to secure authentication to everyone interested.
The current state of the project
- I have implemented the basic Bluetooth Low Energy (BLE) communication profile.
- I have implemented
GetInfocommand so the server recognises the authenticator and starts the authentication process - The very basic implementation of a command
MakeCredentialreceives the data from the server and returns signed credential - The command
GetAssertionreceives the credential and responds with confirmation of authentication.
The words “very basic” mean that many many features of the authentication flow are missing. For example, the private key is a simple hardcoded value and there are no real checks for user presence or user verification.
However, the project can be compiled, uploaded to the ESP32 development board and get “green” results in a simple test.

How to run the project
So, what do you need to run the URU Card at home?
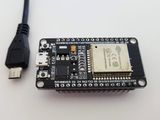
ESP32 development board and USB cable
You can use simple and affordable Wroom 32 development board. At the moment advanced features like secure element ATECC508a are not used so there is no need in more sophisticated boards.

Connect the board to your computer using USB cable and make sure the UART port is available to your system. Make sure the selected port provides enough current as the ESP32 chips are quite hungry and sensitive to stability of the power source.
Development Environment — PlatformIO
I am using a combination of Visual Studio Code and PlatformIO for the development. This combo gives ease of configuration, building and uploading the firmware to the board. Just follow installation instructions for your platform.
Windows machine or virtual environment
Despite the fact, the FIDO2 protocol supports BLE transport, at the moment is it available only under Windows. So, you will need either a Windows machine or a virtual environment. I am using Oracle Virtual Box and the trial version of Windows 10.
Building the project
First of all, get a copy of the source code using either git command or downloading a zip file from the project’s GitHub page.
Then, build the project and upload it to the development board using the following command in terminal (Mac OS/Linux):
pio run -t upload -monitor
The program will start immediately and the serial console will start output of the debug information.
Pairing the device
Open the Bluetooth settings in your Windows. Click the button “Add Bluetooth or other devices” and proceed with the pairing of the “URU Card”.

After a few seconds, the device should be paired and appear in the list of available devices.
Running the test
Open the browser in your Windows. Chrome, Firefox and Edge browsers work equally well as they are using the system layer to communicate with the authenticator device. Visit the page webauthn.bin.coffee and click the button “Create Credential”.

Just follow the key setup procedure and after a few seconds, a new credential will be generated by the device and sent to the browser.
The “Get Assertion” button will use a similar procedure to confirm the credential produced on the previous step.
The same procedure can be executed on page webauthn.me.
Questions?
The current state of the project provides a solid base to work on the fully-featured wireless FIDO2 authenticator device implemented with the Arduino framework. While the many crucial features are still missing, the existing ones provide a solid base to start playing with the technology.
If you have any questions regarding running the project on your development board or joining the development feel free to ask here in the comments section or directly using email or online messengers.


